sábado, 30 de mayo de 2015

L.20 The chloroplast and the photosynthesis

This Monday 11th of May we did an experiment with an algae. During the photosynthesis, plants and algae produce oxygen. The reasearch aspect of this science lab project is to assess how light intensity affects the rate at which photosynthesis occurs and the rate of oxygen production. This experiment is done to relate the light intensity with the photosynthesis process, to measure the rate of photosynthesis and to identify the products of the process and the variables that can affect it.

MATERIALS

-Algae 
-600 ml beaker
-Test tube
-Funnel
-Tap water 
-Light source
-Ruler

PROCEDURE


1- First we assigned the different distances to do the experiment and compare the results to each group.
2- We took the 600 ml beaker and placed 7 g of an algae under a clear funnel inside the beaker (the wide end goes over the algae like in the image). The funnel was raised off the bottom on pieces of blue-tack to allow unhampered diffusion of CO2 to Elodea. 
3-We didn't have sodium bicarbonate so we filled the beaker with tap water, the algae and the funnel should be completely under the water.
4- Then we filled a test tube with tap water and placed the thumb over the end of the test tube. We turned the test tube upside down taking care that no air enters and no water comes out and we put this test tube over the end of the funnel (the skinny part)
5- We marked the level of the water on the surface of the test tube with a marker pen.
6- Each group placed the preapartion close to a light source, each group placed the preparation in a different distance 5, 10, 20 and 25 cm, and one with no light source.
7- We also measured the temperature.
8- Finally we left this preparation for and hour and a half. After this time we measured the difference of gas accumulation on the top of the test tube.


https://blogger.googleusercontent.com/img/b/R29vZ2xl/AVvXsEgCuD3r3AD6wX1b7EWqlk5YBYvlAU5XSIyXZI3UvijWwEkY_KyCSagnihouodwidHECrGH-3GSUFlctBZNEm6Di2grreZ4jh06vp5Jajp6Df_56z_981x-wbR11AUk279yOmHoPYE2NZ6h2/s400/photosynthesis.jpg


Results and observations: everything will be explained in the questions below:

QUESTIONS

1- Identify the dependent and the independent variable of this experiment.
Dependent: gas production, Independent: distance (intensity of the light)
 
2-Using the data from your results prepare a graph and describe what happened to the amount of gas in the test tube.


My group had the 10 cm distance and our water level decreased about 0,4 mm in an hour and a half.
If you have more light intensity, the phtoshyntethic rate will be higher. We controled the temperature and the algae quantity because this could have and influence on the result. Also, we think that Laura's and Andrea's result is incorrect because the distance is higher so the water level decrease should be lower than the other. Maybe they measured it incorrectly.

3-How much gas was producted in the test tube after one hour? And an hour and a half?
We put the results in the graph.
 
4-Write the photosynthesis equation. Explain each part of the equation. Which subtances are produced by photosynthesis. Which gas is produced that we need in order to live? Plants take in carbon dioxide by diffusion through their stomata. Light energy enters the plant via leaves and water and nutrients enter through roots. The plant is then able to make glucose and oxygen. The glucose moves from the leaves to the plant and the oxygen diffuses out of the leaves. The gas that we need in order to live is oxygen.


INVESTIGATION

-Which is the origin of the oxygen that we breathe?
 The trees and plants that are around us and other organisms that do the photosynthesis.

-Where are the lungs of our planet?
Phytoplankton need two things for photosynthesis and thus their survival: energy from the sun and nutrients from the water. Phytoplankton absorb both across their cell walls.
In the process of photosynthesis, phytoplankton release oxygen into the water. Half of the world's oxygen is produced via phytoplankton photosynthesis. The other half is produced via photosynthesis on land by trees, shrubs, grasses, and other plants.


viernes, 20 de marzo de 2015

domingo, 8 de marzo de 2015

L17. Gram staining

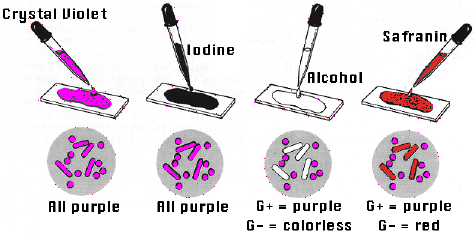
This was the second experiment that we did on Monday 2nd of March. Gram staining is a method of differentiating bacterial species into two large groups: Gram positive and Gram negative. This differentiation is based by the chemical and physical properties of their cell walls by detecting a peptidoglycan, which is presents in a thick layer in gram-positive bacteria. The objectives of this experiment were to differentiate yogurt bacteria and realte the staining procedure with the structure of the cells.


MATERIALS

-Hot plate
-1 slide
-1 coverslip
-Tongs
-Needle
-Gram stain (crystal violet, iodine and safranin)
-Ethanol
-Microscope
-Yogurt

PROCEDURE 

 1- First we prepared a heat fixed sample of the bacteria by spreading somre yogurt on a slide and drying it on the hot plate.
2-Then we covered the smear with crystal violet and waited for 1 min. After that we rinsed it with distilled water.
3-We applied iodine solution for another 1 min and again rinsed it with distilled water.
4-Then we decolorized using ethaol. Drop by drop until the purple stops flowing and washed immediately with distilled water.
5-Lastly we covered the sample with safranin stain for and exposure time of 45 seconds and rinsed the sample with tap water.
6-Finally we dried the under part of the slide with paper and viewed it on the microscope.

Results and observations: We saw some bacteria red and other purple. Why?


Gram Positive Cell Wall:

Gram-positive bacteria have a thick cell wall which is made up of peptidoglycan (50-90% of cell wall), which stains purple.  Peptidoglycan is mainly a polysaccharide composed of two subunits.  The thick peptidoglycan layer of Gram-positive organisms allows these organisms to retain the crystal violet-iodine complex and stains the cells as  purple.

Gram Negative Cell Wall:

Gram-negative bacteria have a thinner layer of peptidoglycan (10% of the cell wall) and lose the crystal violet-iodine complex during decolorization with the alcohol rinse, but retain the counter stain Safranin, thus appearing reddish or pink. They also have an additional outer membrane which contains lipids,  which is separated from the cell wall by means of  periplasmic space.


L16. Epidermis cells

On Monday 2nd of March we did two experiments using the microscope, and now i'm going to explain the first one. The objective of this experiment was to identify the shape of epidermis cells, and to identify and explore the part of the stoma and see how it changes its shape when we add salt water.The pores open to facilitate uptake of carbon dioxide and close to limit the loss of water


MATERIALS

-Slide
-Cover slip 
-Tap water
-10% salt water
-Forceps
-Dropeper -Scissors
-Needle
-Leek

PROCEDURE

1-First we cut the stalk of the leek and pulled out the transparent part of the epidermis using forceps.
2-Then we placed the peel into the slide containing a drop of tap water (so the cells don't die) .
3-Next we took a cover slip and placed it gently on the peel with the aid of a needle.
4-We viewed it in the microscope and took pictures of it.
5-Then we prepared a 10% salt solution and put the solution with a dropper on the left part of the slide (so it touched the cover slip) and placed a piece of cellulose paper in the opposite side of the cover slip to let the dissolution go through the sample.
6-Finally we looked through the microscope once more and took more pictures.


Results and observations:  
When we first saw the cell we noticed the characteristic shape of a plant cell, a geometric one, a squareand the cell wall. Then we looked closer at it and saw the stomas: they were open. Stoma opens when the guard cells are turgid, when the water potential of the cells adjacent to the guard cells are higher than that in the cell sap of the guard cells and the water molecules from the adjacent cells move into the guard cells by osmosis. The opening of the stoma is an advantage because it allows gaseous exchange to take place.
Then we added salt water and took a second look. Now the stomas were closed because the adjacent cells were hypertonic and the guard cells hypotonic so the water molecules moved out of the guard cells into the adjacent cells by osmosis. When this happens, the guard cells become plasmolysed which in turn causes the stoma to close.


QUESTIONS


1- What is the major function of a cell membrane?
The membrane is selectively permeable to ions and organic molecules and controls the movement of substances in and out of cells. Also it protects the cell from its surroundings.

2- What is the major function of the cell wall?
It surrounds the cell membrane and provides structural support and protection to it. Also it acts as a filtering mechanism and as a pressure vessel, preventing over-expansion when water enters the cell.

3-How does salt affect the cells shapes? And the stomes?
I explained it earlier.


domingo, 1 de marzo de 2015

L13. ANIMAL CELLS vs PLANT CELLS

Last Monday we compared animal and plant cells with the mycroscope. The objectives were to identify the major components of cells, differentiate between animal and plant celss and to measure dimensons of the entire cell and the nucleus.


First we peeled off a leaf from an onion. dyed it with safranin stain (red) and then viewed it in the mycroscope.


Then we did some calculations to know the real size of the cell and its nucleous.


After that, we extracted a cell from our cheeks. 


sábado, 14 de febrero de 2015

L12. DNA Extraction

On Monday 26th of January we did a new experiment about DNA extaction. The objective of this experiment was to study the DNA structure and to understand the process of extracting DNA from a tissue.

MATERIALS

- 600 ml Beaker
- 10 ml graduated cylinder
- Small funnel
- Glass stirring rod
- 10 mL pipet
-Safety goggles
-Cheesecloth
-Automatic pipet
-Kiwi
-Pineapple juice
-Distilled water
-90 % ethanol (ice cold)
- 8 ml DNA buffer (25 ml dish soap, 7 g NaCl, 450 ml tap water)

PROCEDURE

First of all we prepared the buffer in a 600 ml beaker. We put 450 mL of tap water, 25 ml of dish soap and 7g of NaCl and stirred the mixture careful because we don't want any foam or bubbles to form! 

1-We peeled the kiwi and chopped it to small pieces. We placed them in one 600 ml beaker and smashed them with the pestle to become a juice puree. 
2- We added 8 ml of the buffer to the mortar.
3- We mashed the kiwi puree carefully for 1 minute without creating many bubbles.
4- Then we filtered the mixture: we put the funnel on top of the graduated cylinder. We placed the cheesecloth on top of the funnel and added all the contents of the mortar carefully on top of the cheesecloth to fill the graduated cylinder. The juice drained through the cheesecloth but the chunks of kiwi didn't pass through.
6- We added the pineapple juice to the green juice (4 ml because we had 20 ml of green mixture DNA solution). This helped to obtain a purer solution of DNA because pineapple juice contains an enzyme that breaksdown proteins.
7- Next, we tilted the graduated cylinder and poured in an equal amout of ice-cold ethanol with an automatic pipet. We put the ethanol through the sides of the graduated cylinder to form a clear layer on top of the DNA solution.
8- We placed the graduated cylinder to eye level and using the stirring rod we stirred only the ethanol and DNA came up. 

Results and observations:
The DNA looks like long, small, white and thin fibers.  

QUESTIONS
1- What did the DNA look like?
 The DNA looks like long, small, white and thin fibers.  

2-Why do you mash the cells? Where it is located inside the cells?
Because you want to libreate the DNA that is located inside the nucleus.

3- Explain what is the function of every compound in the buffer
The salt breaks the nucleus and the cell and the soap takes away the proteins.

4-DNA is soluble in water, but not in ethanol. What does this fact has to do with the method of extraction?  
This means that we can only see the DNA in the part of the ethanol because if it touches the water it will dissolve.

On Monday 2nd of February we repeated this experiment but we extracted the DNA from our own cells from our mouths. We did the exact same procedure but instead of mashing the kiwi we took mineral water with salt and we rinsed our mouth with it. At the end we observed the DNA in a microscope.